mob pins - overview
On Freelance raids, we always try to position mobs in a way that
allows our DPS to maximize their potential. There are several mob
positioning tactics that accomplish a state of efficiency.
However, which one we use, depends alot on the area's geography and mob
abilities.
There are four main methods we use to pin or position a mob: Corner
Pin, Shoulder Pin, Circle Pin, and The Walk. The Corner and
Shoulder pins we use almost exclusively. The Circle Pin and Walk
are last resorts, and only used when we're in an area where there isn't
an object to push against, or when a mob's unique ability prevents
another pin type.
Covered below are each of these four position methods, associated
terminology and some related helpful reminders.
Terminology &
Abbreviations
Push - A term used when a
mob is being moved in some direction. Sometimes we want push in a
certain way, other times we want to prevent it as much as
possible. It's situational, but we often use this term as part of
an instruction, and follow it with a cardinal direction or reference
point to work towards.
Drag - Opposite of push,
this term is mainly used in the FLTanks channel, when we need the mob
brought back or moved in general to a certain spot.
Counter Push - A term used
whereby we want to apply some form of opposite push which the main
direction of the raid is going. This is sometimes required
because we're moving the mob in a dangerous direction, which we want to
avoid.
Escape Control - These are a
form of counter pushers. People that have strong push are
assigned to slightly offset positions, to help prevent the mob from
escaping our pin position.
Warp - A term used when a
mob jumps or dissappears then reappears in another location.
Usually this is not by design and is often something we want avoid.
defense arcs
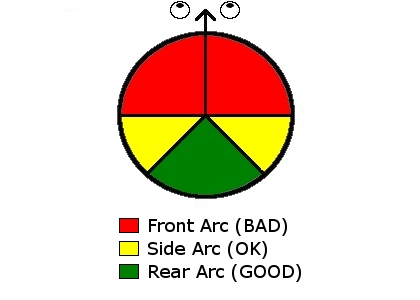
Aspects of a mob's defense, depend on several factors, some of which
are: block, dodge, parry and riposte. Depending on the direction
the offense damage is coming from, determines whether these checks come
into play. That is, a mob will mitigate your damage differently,
depending on which side or angle you're attacking it from. These
angles are sectional, and we refer to them as arcs.
The diagram above shows the three main defense arcs of a mob.
corner pin
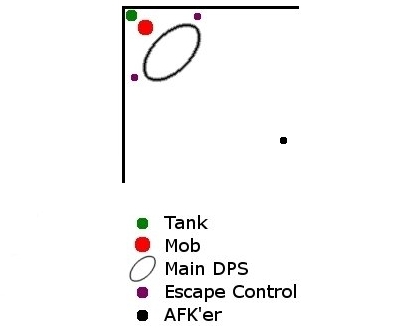
This is our most common pin, with push directed at the vertex.
When done correctly, it gives the main raid a clear rear arc window of
opportunity. With melee attacking from this rear arc, the block,
dodge, parry and riposte checks won't come into play.
The push factor is simple in this position, as everyone is pushing from one main direction (rear towards the corner). The wall/object which comes to a sharp point, doesn't allow for the mob to escape easily base on the push alone. We position escape control people to help keep the mob in this position when applicable.
Depending on the vertical angle we're pushing the mob against, can
sometimes have an undesired effect. For example, a mob may start
drifting up a wall, and then fall through or warp. This is why at
times, we try and experiement on different corners until we find one
that works correctly.
shoulder pin
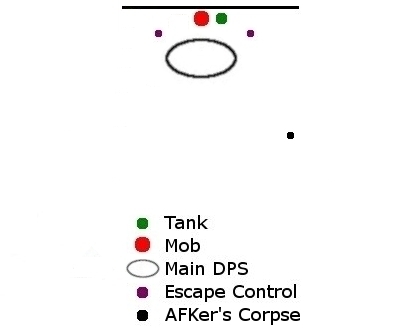
This is another common position pin we use when a standard corner pin is not feasible. It's based on pushing on the side of a mob, towards a flat wall or object.
One side arc is still available for DPS, while selective core DPS'ers are given the rear arc. Be aware that the main DPS will always be pushing from the side, towards the wall in this case. We only position rogues and selectives in the rear arc to maximize their DPS potential.
When using this method, it doesn't matter how good our side push is, we will always have to counter from the front and back. This is where our escape control people play a key role. They must counter the push effectively and prevent the mob from moving back and forth along the wall. This control is usually co-ordinated in /rs, and adjusted throughout the event.
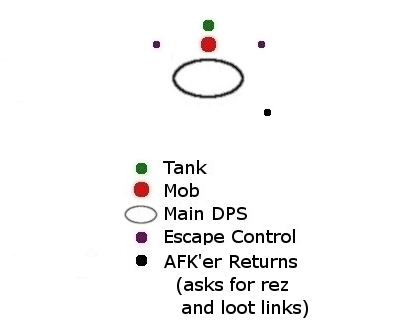
circle pin
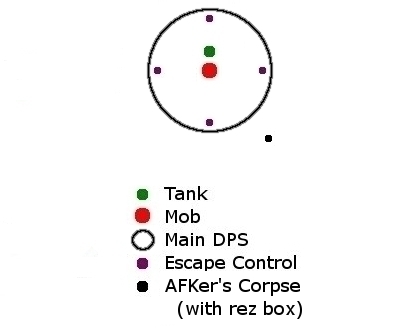
We rarely use this pin, mainly because it's difficult to co-ordinate,
limits our DPS efficiency, and increases our damage intake. It's
based on the melee pushing the mob equally from all sides, in an
attempt to keep the mob stationary.
Although the side and rear arcs are still available using this method, we have to position alot of escape controllers to keep the mob stationary. Since we're using more controllers, they're often picked from the DPS pool. These DPS are now countering push from bad arcs, and as a result, decreases our DPS potential as a whole. Additionally, these DPS acting as escape controllers are not always equiped to take the brunt of frontal arc checks (riposte), and so their damage intake is increased substantially.
the walk
This is another uncommon method we use, a type of spin off really based
on the circle pin. The idea is, the raid pushes from the rear
arc, towards the Main Tank. The MT then edges backwards as the
mob is being pushed, and effectively walks the mob in a direction.
It takes an extremely good tank and escape controllers to make this work. If the tank edges backwards too fast, the mob will summon and result in the raid being exposed to defensive checks and possibly AE's/other damage intakes. If the tank doesn't edge backwards fast enough, the raid will push the mob past the MT, and again cause detrimental effects. Additionally, the MT must be aware of his/her position within the virtual space and not edge back into a bad area.
Another tactic we use during this pin, is flips or switches. This is when the MT calls for the raid to move to the opposite side fast, and the mob is then turned to compensate. It's done to change the walk direction and avoid edging towards undesired areas.
important info - please
read!
Early Engages:
Always wait for the Main Assist call, before engaging. Unless you are assigned to a specific duty that excludes you from this call. It's important that we position mobs quickly, which is easier to accomplish with only key people placing the mob first, prior to the MA call.
Pets:
Owners of pets, position smartly. What I mean by this is, don't just /pet attack on and then start nuking. This is counter productive, when we're trying to maintain a mob in a certain position. The best thing to do here is, position your pet as a regular melee would be positioned. That is, go with the flow of the melee. Stop your pet, back off, reposition it, so it's pushing in the proper direction. Pets are huge pushers, and AFK owners of pets with attack on, or no pet holds, can seriously mess up our efforts.
Watch /rs for instructions whether to use your pet or not. If there's no mention, then you can use them.
Screenshot!
